Most questions about mobylette problems concern the old NOVI-ignition.We are delighted to say: Problem has been solved! In the past 20 years Pantin has done a lot to promote the conversion from old internal coils to external coils.
From 2006 we have promoted the use of external condensators, too.
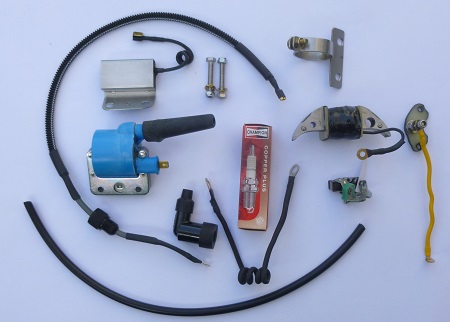
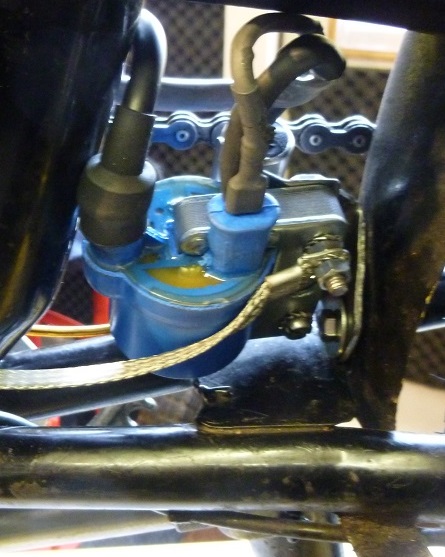
We are also the creators of several smart parts such as our:
powerful feeding coil on the old steel core;
Pantin high voltage condensator in a steel casing;
terminal with just one cable to the breaker points;
better protected and better insulated intermediate cable;
brackets for coil and condensator assemblies.
Long rides - on an old mobylette across Europe - are no longer a wild guess. Regrettably, there are collectioners, who think that the old stuff still is working well.For those people below a summary of the main cause of ignition problems.
Many internal high tension coils show the same problem: theyare just worn. Even brand new coils (NOS), which never have been used before, will show next problem: the insulation properties of the thin windings of the coilhave become quit poor. As a result of the high tension in these windings- about 15.000 Volts -there will be a lot of short circuits. The spark becomes very weak. The signs are often like this:
Starting can give a lot of trouble.
After 5 minutes, when the coil is getting warmer and the resistance of the copper windings has increased, ignition fails.
Remind that the pressure of the mixture in a hot cylinder is higher and the spark meets more resistance.
Sometimes the engine runs fairly well, but doesn't reach its top speed.
We saw a lot of troubles in the past 20 years, but fortunately there is an adequate solution for this ignition problem and besides it doesn't interfere withthe authentic looks of your old timers. More details, questions and answers about this ignition system can be found in the ignition manuals: Publications.
A short moment before a piston of a mobylette engine reaches its upper position (TDC= Top Dead Centre), the engine's spark plug should fire.
The moment before TDC must be equal to moment of maximum pressure after TDC (symmetric combustion).
In this case performance will be best.
Too much pre-ignition will lead to detonation, that will cause noise and even can damage your engine.
Too little pre-ignition leads to too much conversion of chemical energy to heat instead of work.
This pre-ignition is not for all mobylette engines equal and depends on various factors.
Moreover these factors can interfere each other.....
Factors influencing the optimal pre-ignition:
* Compression ratio (1: 6 or 1:10)
* Material and cooling of cylinder head
* Ambient temperature and inlet manifold.
* Research Octan Number (RON) of fuel.
* Air-fuel mixture ratio.
* Atmospheric pressure (altitude!)
* Shape of combustion chamber
* filling degree of cylinder
* Load on engine including ratio of transmission.
What to do about it?
Adjust your pre-ignition as prescribed by the manufacturer. They have done many tests.
When you have changed your carburettor, cylinder, cylinderhead or type of fuel,
changing your pre-ignition could result in a better performace.
But...commonly, there is hardly measuring equipment available, while there are many variables.
Generally this does not lead to a great success.
This means starting from the manufacturer's experience is the best option.
Schedule pre-ignition for models till 1975 (mm before TDC)
✪ Models from 1950 -1963: 2.8
✪ After 1962: 2.5 - 2.0
✪ M1-M3: 1.5
✪ Variator models 1.5
This means that the ignition cam of a two-stroke engine has to be adjusted. The cam will trigger its breaker points at the right moment.
More information about adjusting is giving in the ignition manual. Manual
cam, which triggers the breaker points.
tool to loosen cam.
simple tool for adjusting pre-ignition.
HOW TO TEST A CONDENSATOR?
Lately somebody asked by way of our guestbook for a test method. Well, there several ways to test a condensator:
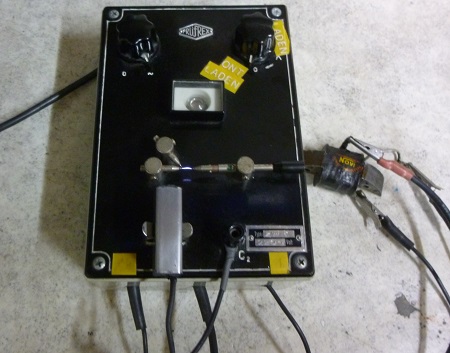
1. By way of a professional ignition tester such as Prüfrex.
2. Check the resistance: this must be more than 200,000 Ohm.
3. Charge the condensator with a current of 12 Volt.
Addendum 3: Disconnect the battery or battery charger and wait for one minute.
Check by way of a led-light if the charge is able to light the led. If nothing happens turm the led and connect it the other way. Remind a led is a diode.
Instead of a led you could use a multi-meter.
People often ask why we don't apply electronic ignition systems?
Well, there several reasons why we don't apply those on the old AV7-engines:
The flywheel should be replaced by a smaller one. This would spoil the authentic looks!
Electronic components are not always reliable; especially not in a hot environment.
Warranty requests concerning electronic parts often causes problems at the dealer.
Modern electronics cannot be repaired easily when you are in the middle of nowhere.
Our feeding coils are winded on the old high tension coil; so no fitting problems.
WHY DO MY BULBS BLOW?
The trouble mostly starts with the lighting coil that normally offers a current with a tension of 40 Volts.
This happens when there is no or a low load. When there is normal load of a front and rear light, the voltage will decrease rapidly.
Three important reasons why bulbs will blow:
1. You are using bulbs designed for a bicycle.
2. A bad connection at the bulbs or switch.
3. A single brake bulb or flashing indicator will not decrease your current voltage sufficiently.
What van be done regarding these problems?
Ad1.
Apply the right bulbs with prescribed power (Watt).
The more power the bulbs will use; the lower the voltage in the circuit will be.
A mobylette with an 8 Watt electrical system, requires bulbs with a total power of at least 10 Watt.
Example:
Front light: 6V - 7Watt
Rear light : 6V - 3 Watt or 12V-3Watt
Ad2.
Check your wires and mass cables. Remove oxidation at the connectors and bulbs. Consider the use of contact spray.
A bad connection at one of the bulbs or switch lowers the total bulb power and the tension becomes automatically too high.
Ad3.
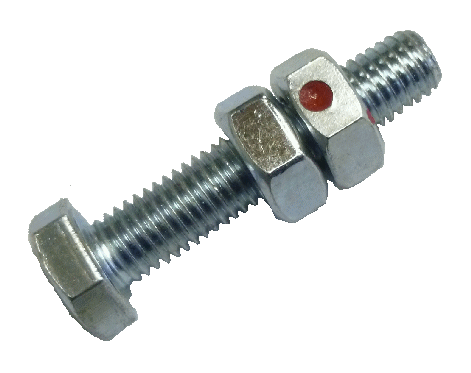
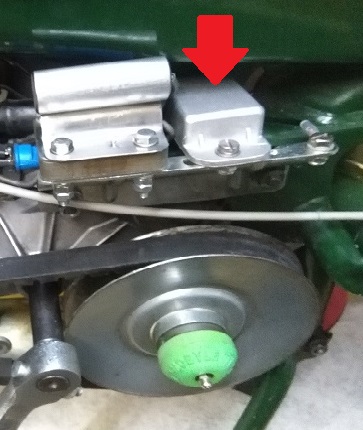
Mount a zener diode that will stabilise your tension in the circuit.
For a brake system or in case of flashing indicators this is a good solution.
The zener diode on the right side (red arrow) protects a bulb in the tail light,
which will light when the brake is used. In the electrical circuit the zener diode is mounted behind the brake switch, so normally it does not waste energy.
Just when the bulb is activated, this zener diode will limit the tension to 6 Volt.
A lot of space at the AV92/SP93
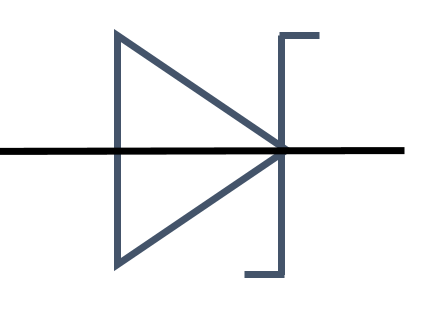
Zener symbol
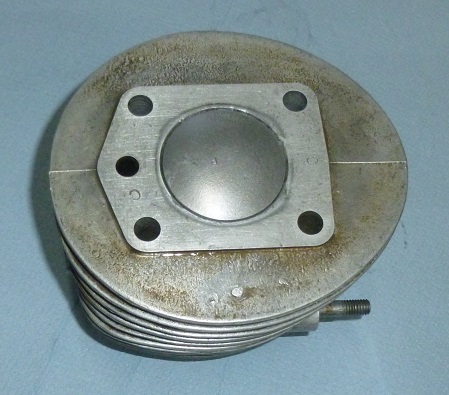
ARE ALL PISTONS THE SAME?
The process of making a layer of hard-chromium inside of the barrel leaded to several sizes of barrels.
Actually this was not meant to be, but it was the result of an imperfect process.
So different piston sizes from size AA to P and more, were available for differently sizes of barrels.
You should apply an E-barrel together with an E-piston; however sizes D and F are acceptable, too.
Resizing a piston
What can you do when you only have a bigger piston?
In case of a bigger piston, you may consider of downsizing its diameter by use of waterproof glass-paper.
It is a matter of grinding off just some micro-millimeters in many small steps.
You should start grinding at the top of the piston and regularly check if the piston can be moved inside of the barrel from below.
When the piston is able to disappear into the barrel easily and will stop as soon as its reaches the barrel´s top, the play between barrel and piston is right.
Notice that the size at the piston´s top is smaller than the lower side.
When the job has been performed well, you will be rewarded with a higher compression and less noise than before.
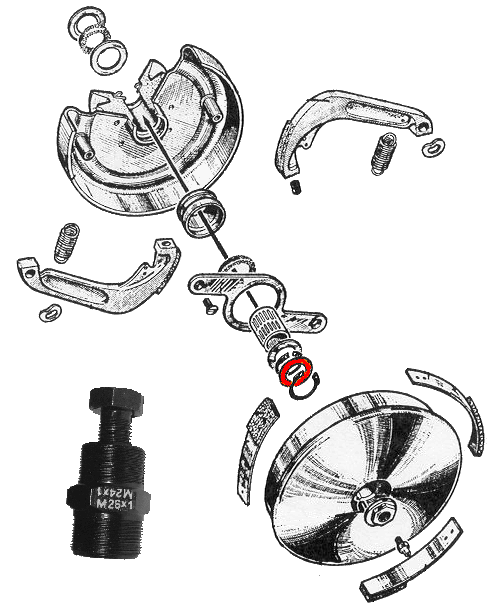
DISMANTLING DIMOBY CLUTCH
From time to time an experienced mechanic is calling, because he is not able to dismount the centrifugalclutch. Let us see how we can fix it.
Firstly you remove the hexagon nut and the grease nipple.
Next you need an extractor, which has to be screwed into the cover of the clutch.
This tool is shown in the lower left corner of the drawing on the right. Its inner bolt pulls the cover off the camshaft.
When you look at the drawing, you will see in front of and behind the red ring a so-called "Seeger ring orcirclip ring ".
Mostly people manage to remove the first ring with a pair of circlip pliers and think that the job has done. They are looking against the (in this drawing = red colored) washer, which covers the second circlip (Seeger) ring, and they are very surprised that they cannot remove the coupling housing.
The red washer has to be removed with a magnetic extractor or with two small pins. Because of the greasethis simple ring can be stuck on the second Seeger ring. Sometimes it helps when you shake the engine a bit.
After the washer has been taken away, the second Seeger ring can be dismounted quite easily.
The red washer has to be removed off the camshaft before you can see the second circlip ring. This circlip ring has been mounted on the shaft
WHY DOESN'T MY CLUTCH WORK WELL?
CLUTCH REVISION
After many years of service: linings of clutch shoes are becoming too thin.
Replacement of those small primary shoes (3 or 4 on the clutch outer cover) or even a new clutch is necessary.
After replacement of those (3-4) shoes by riveting, you will have to remove the rests of the rivets inside of the cover.
The best way is using a lathe in order to get a smooth surface for the two big clutch shoes.
If you do not perform this operation well: you will be surprised by ugly sounds and nasty vibrations later.
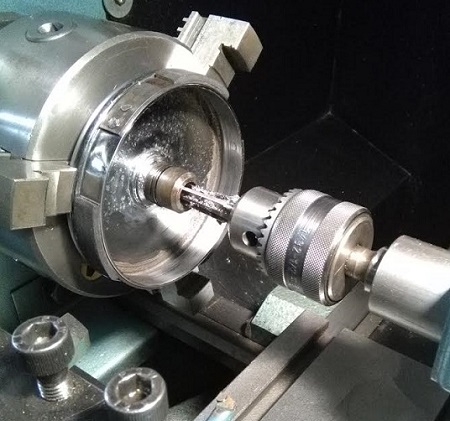
CLUTCH OUTER COVER COMES OUT OF THE DRUM TOO FAR
In the image on the right side: a taper reamer makes the conical bore a bit deeper. Reaming its bore will be done when the hub has been replaced or when you want to use a new Transval clutch cover.
We discovered some time ago that those Transval covers are differently dimensioned. After reaming,you can apply new (Transval-) covers at old model Motobécane variators.
You need a special conical reamer to perform this act.
DOES A MOBYLETTE CRANK SHAFT NEED SHIMS?
ENGINES FROM 1962
At most AV7 engines, we find an aluminium crank case and a big radius on the outer side of the crank cheeks for its bearings. All has been produced very accurately.
On this crank shaft, they have applied non-standard bearings with a bore of 16mm.
The possibility that the assembly‘s axial play is not right, is not very likely.
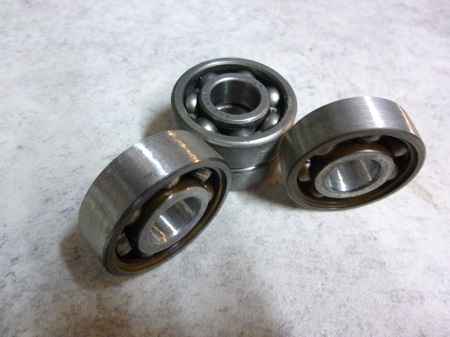
Nevertheless, we always check the axial play with help of fitting rings or better a pair of old bearings.
Old bearings should be ground off a bit at the inner as well as at the outer diameter (see picture).
With help of the customised bearings, you can assemble the crank case and shaft easily and determine the assembly’s axial play. This should be about zero with the two parts of the crank case completely closed.
Later during the final assembling with real bearings you will have to add a crank case joint. This will give the crank shaft the right play in axial direction.
Suppose, the crank shaft can be move 0.3 mm in axial direction. Then you should add a 0.3mm shim between one of the bearing and crank shaft cheek.
ENGINES BEFORE 1962
These engines have a different crank shaft and bearings with a bore of 15mm. Sometimes the crank case has been made of Zamac (a zinc and aluminium alloy). The production accuracy is less than after 1962.
Checking and applying shims is needed for getting the right axial play.
Final conclusion: old engines before 1962 often need shims and from 1962 it is mostly not required.
Old worn and rusty bearings, which got a second life.
RELAY BOX OVERHAUL
Gerard van Dijk put a large collection of videos on YouTube.
One of the videos concerns the overhaul of a relay-box.
Manuals are to be found at the Tobec-forum.
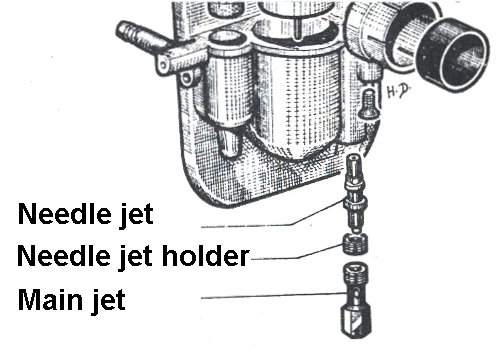
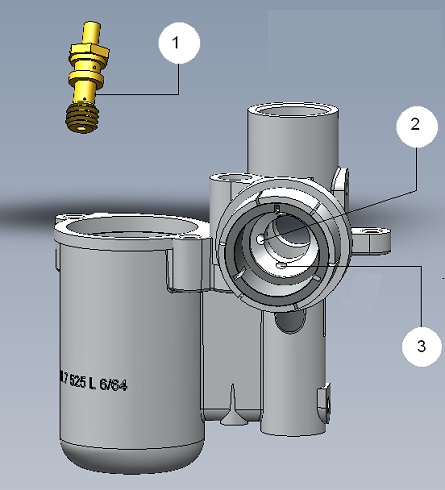
HOW TO CLEAN A CARBURETTOR AND NEEDLE JET
carburettors can be very polluted. Most people are aware of that fact and will cleantheir carburettor thoroughly. However, often they forget to check the little hole(s) of the needle jet.These holes will provide the mixture with some extra petrol when the throttle has nearly closed.
When your engine has stationary problems this may be the cause. For the 12 mm carburettors and higher you must dismantle the needle jet atthe underside of the carburettor as shown in the picture on the right.
For older models (without needle jetholder) the needle jet must be removed and inserted top-down via the throttlevalve bore.
Some carburettors - like the ones for BG and early AV42 - have a threaded needle jet, so with a socket wrench it has to be removed.
Examples of jets for a 12mm carburettor
Example of a threaded needle jet
We found a lot of different needle jets a long time ago. The one in the middle proved to be excellent in a 12 mm carburettor.
Certain needle jets, which are larger than 12 mm, are hard to be find; exception perhaps the one for a 14mm Gurtner.
Some examples of needle jets with holes for stationary speed.
HOW TO TUNE & GET MORE SPEED?
Our mission is not to ruin ancient engines by increasing their performance, but getting them on the road again according theiroriginal specifications. Though they are old now, they should run like in their young days or even better, when improved sealing, ignition or lubrication additives have been applied. Unfortunately many people complain that their engine is not running well after they have restored that engine "perfectly".The reality is - without any doubt - different. We always note many mechanical defects in vehicles.
Transmissions malfunctioning because of worn chains, sprockets and bearings.
Crankshafts, pistons and cylinders with too much clearance.
Ignition is another source of failure. If the spark fails regularly then the performance is considerable lower.
The best and cheapest start for power enhancing is: make sure that the basics are good.
All parts should be in a "pretty" mechanical condition.
Strong ignition system.
A cylinder with Nicasil lining as manufactured by Airsal .
Better lubrication by using oil enhancing additives as TSL
Great cylinders with low friction.
TSL: a great oil enhancer
If so, then you can start thinking about improvements. Generally your little bike will run fast enough now.Its design was not meant for high speeds....
Frame, brakes, tyres and suspension are often inadequate for use at speeds above 50 kph. An exception for the vélomoteurs such as: SP98D, SP99, 99Z and D52.
Sometimes people use bigger cylindres and pistons than the standard 50cc set. They are not always aware of the fact that more power and higher speed means less safety on the road, moreover
this could give insurance problems in case of a major traffic accident.The famous French poet La Fontaine used to say: "Do not hurry, but leave on time!" We only can agree with that statement.
Top 12 of problems that influence factory speed
Pre-ignition is wrong.
Poor ignition coil.
Poor capacitor.
Spark plug failure.
Main jet in carburettor is too large or too small.or too small
Piston rings too tight (play should be 0.2 mm).
Worn piston and piston rings.
Gas throttle cannot be opened totally.
Leakage of crankshaft seals.
Exhaust is silt (AV92 and SP93).
Decompression valve does not seal sufficiently.
Transmission problem (coupling, brakes too tight, chain)
WHEN IS MY CHAIN WORN OUT?
Experienced people try to put a screwdriver under the chain at the rear chain wheel.
We mostly measure slack
- Remove the connecting link from the chain and put the chain on a work surface.
- Press the links together to obtain the shortest length = Lmin
- Pull the chain ends and the longest length = Lmax can be measured, now
The difference between Lmax and Lmin is slack.
If it is equal to or greater than 15mm, then it is getting time to replace your chain.
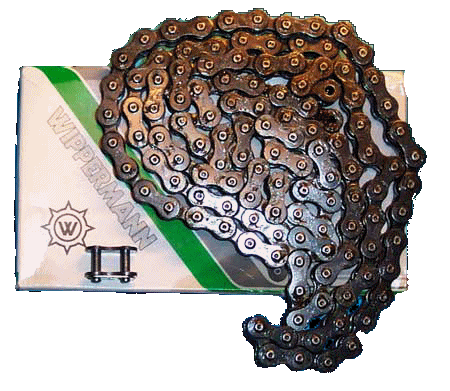
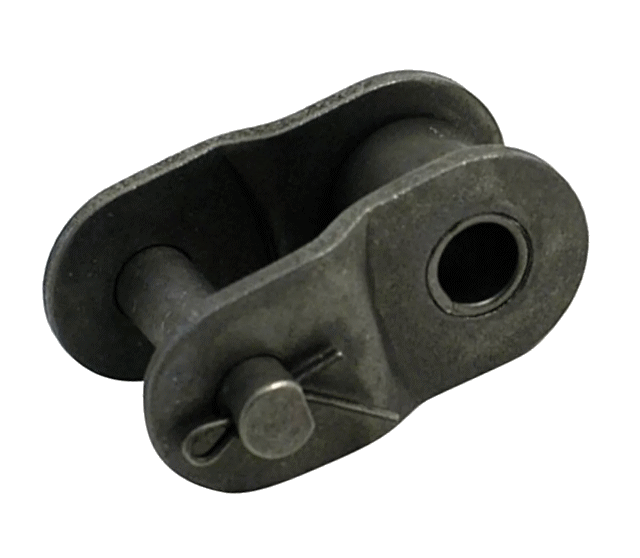
WHAT IF MY CHAIN DOEN NOT FIT?
415 - CHAIN
Firstly you must use the right type of chain. For mobylette this is a 415-chain.
Size = 3/16 x 1/2 Inch.
For heavy duty and open chain case we sometimes use a Wippermann 18 chain with a half chain link.
Disadvantage is the width of this chain; it may give problems in a closed chain case.
CHAIN LENGTH
The problem is that adjustment is sometimes difficult. You must dial the number of links and remove some full links.
But then the chain is often just too long or too short, because the adjustment of the wheel is too limited. A so-called half link can be useful then.
Unfortunately mostly there is no half link available.
You will have to improvise with a full link.
How?
We usually remove a number of full links in a way that the rear wheel can be moved all the way back. The tension is then reasonably good.
After some use in daily traffic your chain will be stretched, it is recommended to check the tension of your chain regularly.
When the tension is far too low, then you are able to remove a full link from the chain.
Now you can push the rear wheel all the way to the front and your chain can be adjusted well.
Example of Renold half link.
HOW STRANGE ARE THESE SCREW THREAD SIZES?
Everybody dealing with mobylettes will meet this problem: normal metric bolts and nuts will not fit!
It is not a matter of strange French thread, but it is just metric thread with a different pitch. The well-known screws for the engine side panels are an example.
A long time ago they did not choose for standard M5x0.8 but instead for M5x0.9 (mm).
Why didn't they not choose for standard thread?
The only reason is a commercial one; as customer you cannot apply a cheap standard bolt or nut.
The fact, that Motobécane often used bolts and nuts with a pitch of 1mm, is an advantage when you make the thread on a machines for different products. You do not have to change the pitch every time.
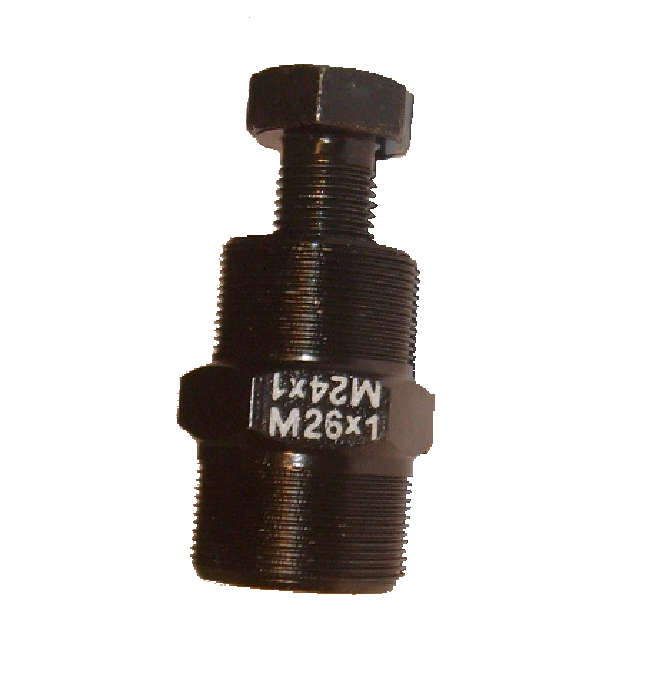
You will find a pitch of 1mm at next threads: M7, M8, M10, M11, M12, M13, M14, M24, M26, M46 and a lot more.
Happily most taps and dies can be found on the net or at a classic jumble.
If we do not have a tap or die for big sizes, we make that part on a lathe.
parts with special thread Click picture to enlarge
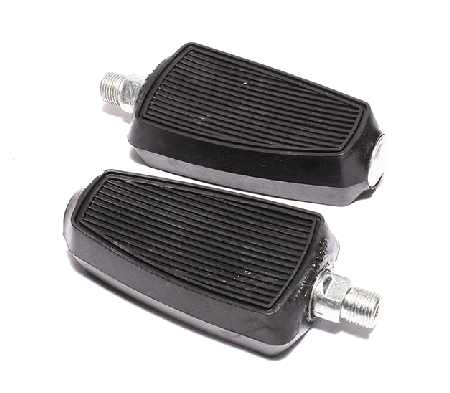
WHY DO MY NEW PEDALS NOT FIT?
There is a lot of confusion about pedal thread.
Left and right pedal
The pedal on the left side of your mobylette has a thread, which will turn counterclockwise, while the one on the right side has a thread, which will turn clockwise.
Metric thread
The old French mobylettes use pedals that have been provided with M14 x 1.25
On the left side you will find a G and on the right side letter D.
G stands for gauche (left) and D stands for droit (right).
BSW
This thread is based on a British standard. (BSW 9/16 inch x 20TPI) On the pedals you will see the indicators L and R
So this is not a German thread or Dutch thread, but just British Whitworth. Remind that Britain was the great pioneer of the safety bicycle.
A lot of parts and sizes are still expressed in Inch.
Nowadays we see that BSW is becoming the general standard for pedals.
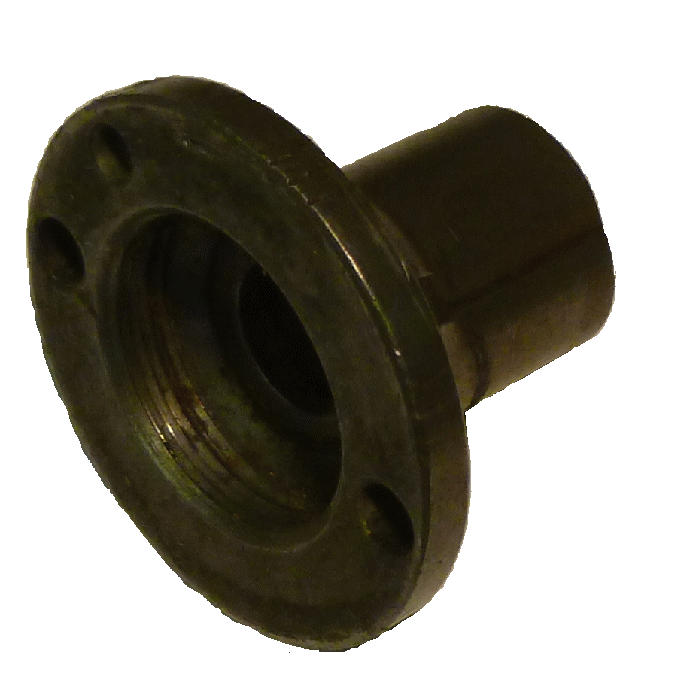
When your pedals do not fit, you should swap them for the right pedals. Sometimes we adapt the crank thread by pressing a bronze bushing inside a crank and next
we provide this bushing with the wanted thread.
Of course you need special taps to perform this job.
example of French pedals
TYRES FOR 21 INCH RIMS
Several years ago these tyres were a problem, but suddenly some manufacturers started to produce these tyres again. There are several tyres fittingon the same 21 inch rim:
There is no such list, where you can order parts at PantinNL.
Our stock of spares is both extended and limited. Helping everybody is not our mission anymore.
Nevertheless we will put a lot of available spares on this site during winter 2022-2023.
WHERE CAN I FIND 3D PRINT FILES?
Public sharing of files for 3D prints is not our policy.
In future we may store some examples in the Pantin-private section for projects.
When you want to design a special part and you need some help, contact us by mail.
WHERE CAN I CHOOSE AN OTHER LANGUAGE?
Nederlands
Deutsch
Français
Espagnol
and many others . . . . !!!
Simple by using: Translate Google !
website: https://translate.google.com
Some help:
Fill in the URL and the desired language.
Notice: translation will not be perfect and pictures are excluded from the translation process.
A large publication about improving an ancient ignition system. This publication is in Dutch. It is the result of many years of experience with all kind of models and runs under heavy circumstances.
The new version 6.0 NL will be ready in summer 2021.
We always keep some ignition sets in stock for friends and interesting projects, but unfortunately we are not able to help everybody. Warning:
Many coils, condensators, spark plug caps and ignition points, you can buy via Internet or at jumbles, are often junk ware.
ECS-2015 English
By: Henk van Kessel
This manual in English is written for people, who want to convert their old ignition system to an external coil system.
New version 5 Several additions from the Dutch version have been implemented.
In summer 2021 version 6.0E will be ready.
La génèse de la mobylette (en français)
By: Peter Langemeijer, Patrick Barrabès, Ben Kaptein, Henk van Kessel.
French version of an international publication from 2009, that leads you back to the very beginning of the first mobylette.
Het ontstaan van de mobylette (in Dutch)
By: Peter Langemeijer, Patrick Barrabès, Ben Kaptein, Henk van Kessel.
Dutch version of an international publication from 2009, that leads you back to the very beginning of the first mobylette.